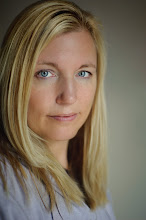
I always love doing the fix-it Fridays at I ♥ Faces.
This week is no exception and we had an extremely cute picture to work with!
Here is the original:
I love her expression in this picture!
Here is my "fix":
and what I did:
Lightroom (I've recently downloaded the free beta version of the new Lightroom to see if I like it and would consider buying it. This was a great opportunity to experiment with it to see if I like using it over photoshop to "fix" a face that is overly bright on one side and a bit shadowy on the other. I was impressed with what Lightroom could accomplish even with my "newbie" skills):
import picture
recover 100
fill light 39
blacks 1
clarity +26
vibrance +26
tone curve: highlights-42; lights -36; dark +6; shadows +21
export
ran the exported picture through noiseware (portrait mode).
photoshop 7:
- eyes: duplicated the layer and did a slight curve adjustment up in the middle just to brighten them a bit; added a bit more contrast; unsharp mask (amount 50; radius 1; threshold 0); made that layer into a mask and masked in only the colored parts of the eye. duplicated that eye layer and changed the mode to soft light. reduced opacities on both the eye layers until it was how I liked it and merged the 3 layers together.
- used an action from http://amymcmasterphotography.blogspot.com/ called "Sweet Skye". Amy does really beautiful actions, be sure to check them out! I tweaked the action until the picture was how I liked and flattened the image.
- duplicated the picture layer and flipped that layer horizontally. Made that layer into a mask and masked in the background of the flipped layer over the background of the original layer just by the stairs (so that the stairs were hidden). merged the two layers.
- brought in this texture: http://www.flickr.com/photos/ohablizel/3173733169/in/set-72157603704553263/ , changed the mode to color burn and masked her out.
- brought in the Garden Lights Nr.1 texture that I had downloaded when doing the "In the Fairy Garden" tutorial on I ♥ Faces:http://iheartfaces.blogspot.com/2009/10/inspiration-in-fairy-garden.html; set it on screen mode and masked her mostly out (I left parts of her in at different opacities, just playing with it until I liked it).
- flattened the image and did a slight burn at some of the edges
frame:
- duplicated the picture layer and cut out a section in the middle of that layer, leaving only the outer edge, then by blending options:
- added a drop shadow, picking a dark color from the picture as the shadow color and changing the distance to 0, the spread to 0, and the size to 21 ( I left the angle at 30° and left the mode at multiply at 75%)
- bevel and emboss - an inner bevel and choose my highlight and shadow colors from the picture
- pattern overlay- choose a super fine pattern and set it at multiply at 56%
- duplicated the picture layer and brought it to the top and made it into a mask. I masked her in (so she's in front of the frame) and masked in parts of the brighter parts of the background so they were brighter on the frame.
- flattened the image
finished!
If you want to check out some more fixes, be sure to head on over to
I ♥ Faces: http://iheartfaces.blogspot.com/


This is super cute! I love a little sparkle...
ReplyDeleteI love the work you did on the eyes; very natural and not at all over-processed.
ReplyDeleteWow - it looks like a painting now.
ReplyDeleteWow - that was some editing! I love the way you have her in front of the frame. I don't get what you did, but I know it looks brilliant! :D
ReplyDeleteVery sweet! Looks like a painting
ReplyDelete